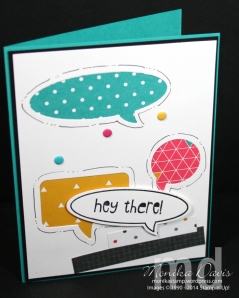
I think the Just Sayin’ Stamp set and the Word Bubble Framelits are a fun combination from the Occasions catalog. This Pinterest inspired card is one that the girls made at my team meeting this past weekend. Literally something I threw together at the last minute (they laugh at me for that).
This is how I made it –
- The card base is Bermuda Bay.
- For the Whisper White layer place it on the cutting mat on top of the Magnetic Platform and then add the word bubble framelits – I used 3 different ones. Run it through the Big Shot to cut. Set the cut pieces aside and use on another project – for this one we are using the negative piece.
- I cut pieces of the Kaleidoscope Designer paper – I think mine were 2″ x 3″ pieces. glue them to the back behind each of the cut holes. Where the paper extends out beyond the edge of the white – trim – these will be the pieces that get layered on the front – and I did not worry about them being straight or perfect at all. They were what they were.
- Layer the White on a piece of Basic Black and add to the card base.
- I hand drew the lines/dots around the cut outs.
- Add the leftover strips to the front – I used the opposite sides from what I used in the word bubbles.
- I stamped the Hey There on another piece of White and cut it. Alternately you could use one of the shapes that you cut out and try to line the stamp up – or stamp it before you cut and that would save paper – unless you want a different shape. Add to front with Stampin’ Dimensionals.
- Add some coordinating Candy Dots – for this one I used Bermuda Bay, Crushed Curry and Melon Mambo.
Thanks for stopping by today!


