Mail a Card Monday

Mail a Card Monday

I decided for 2018 to challenge myself to mail at least one card every Monday.  And to post it on social media with the hashtag #mailacardmonday – I figured if I told the world I was doing it and everyone was looking for me to do it I was way more likely to actually do it.  We are now 8 Monday’s into the year and I have been sending out at least 7-8 cards every Monday!  It’s working.  So how many days does it take to form a habit – is it 21 or 66 so something else? I don’t know for sure but right now for me I seem to be doing good and plan to keep it up.  Who is joining me?

Have you seen my mailbox?  I’ve been posting my mailbox with either my cards in it or me putting them in.  It’s funny how many people like my mailbox.

mail-a-card-monday

We don’t actually get a choice for out mailbox in my neighborhood.  Everyone has the same one.  They do look pretty good but it doesn’t take much to break one.  A neighbor ran right over mine a couple of years ago.  And every neighbor dog makes a pit stop there.

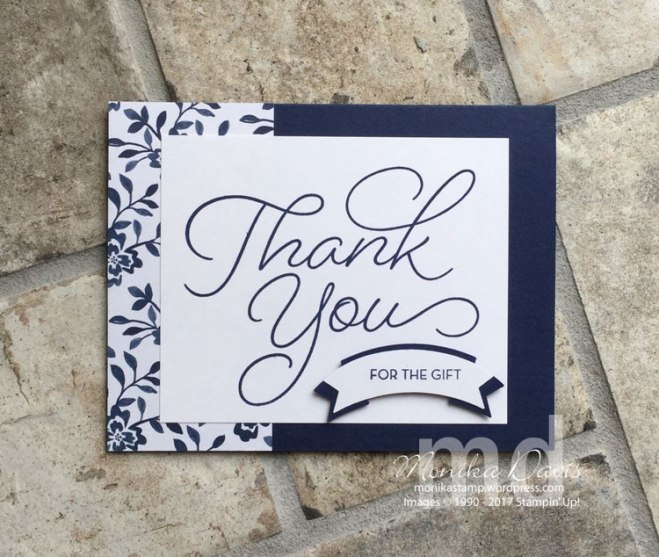
Anyway I thought I would share with you one of the cards going out in my mail today.  This week’s mail is really going out on Tuesday because it was a holiday on Monday.  We’ve had a lot of Monday Holidays already this year.

thanks-with-love

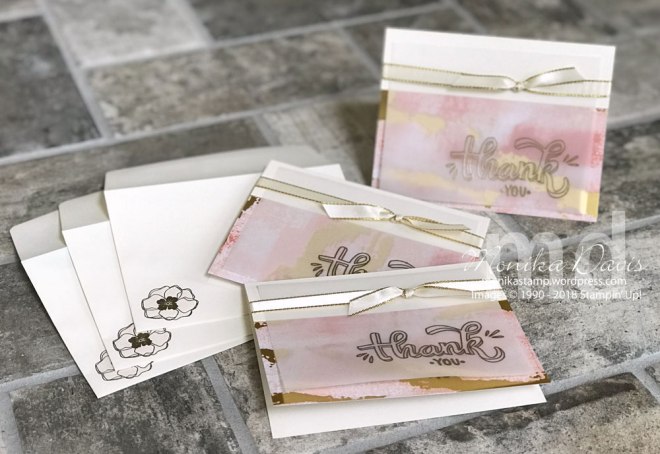
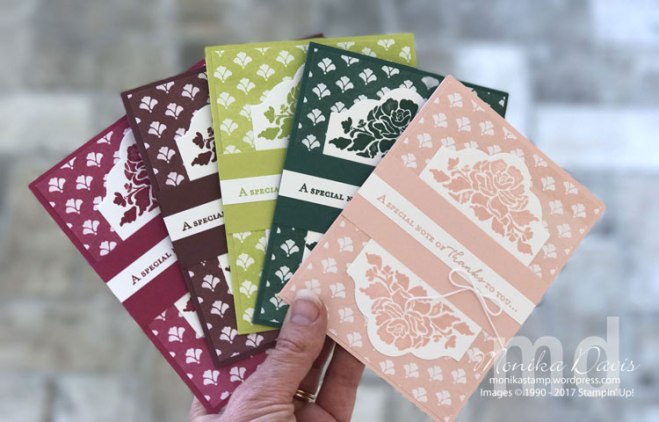
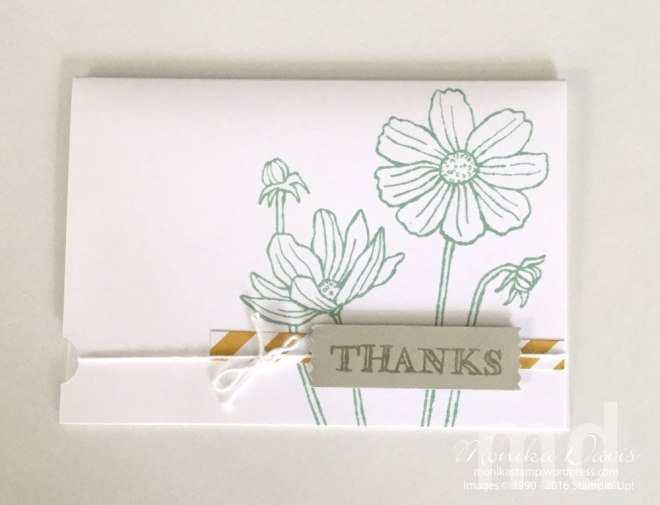
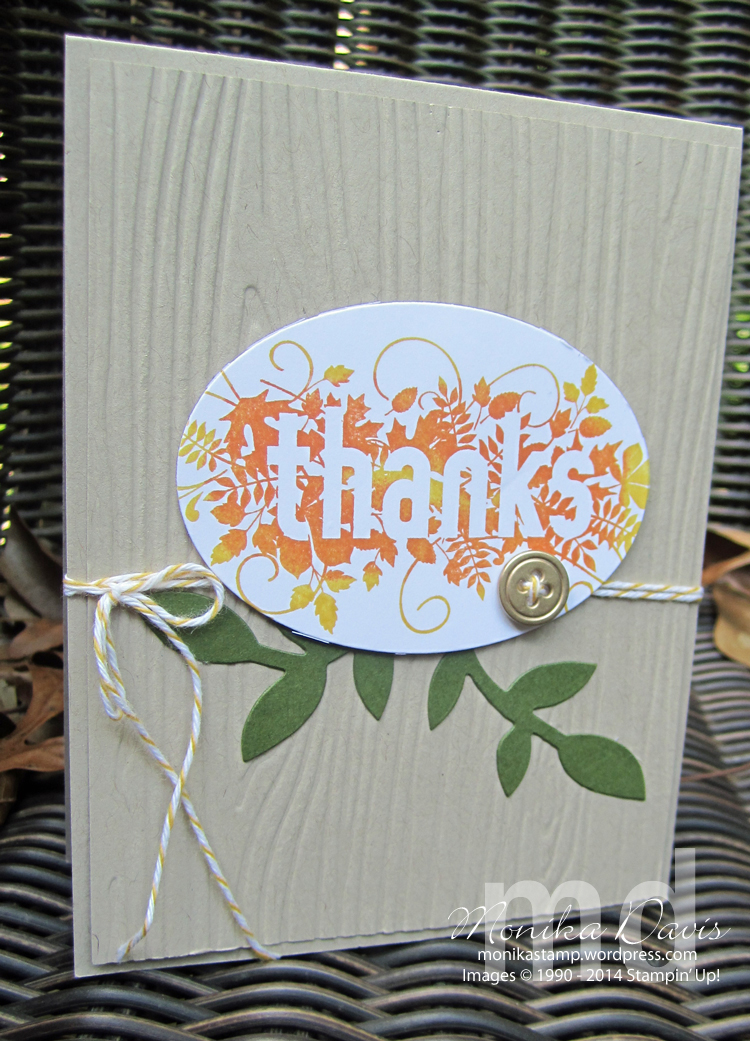
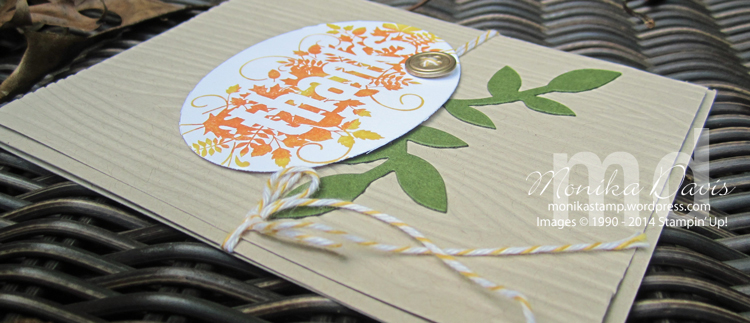
I have some thank you cards going out for some online orders that I’ve received in February.  I’ll have more going out next week too.  This is a fun card idea that I got from another demonstrator (my friend Renee Kohnke) when I went to Michigan at the beginning of the month.  This way you can show both sides of the Designer Series paper.  I modified it a little bit so I could use a 3″ wide piece of paper on my cards. You are basically cutting away 2-3/4″ from the front of the card and then attaching the designer paper to the short flap in it’s place.  I just realized I should have taken a photo of the inside of the card so you could see it.

Here are the supplies and measurements for you:

  • Very Vanilla Thick card stock – 5-1/2″ x 5-3/4″, scored at 4-1/4″
  • Painted with Love Specialty Designer Series Paper – 5-1/2″ x 3″
  • Vellum card stock – 5″ x 3-3/4″
  • Color Me Happy Stamp set
  • VersaMark Ink
  • Gold Embossing Powder
  • Heat Tool
  • Tear & Tape
  • 3/8″ Metallic-edge Ribbon Gold
  • Glue Dots
  • Very Vanilla Envelope
  • Pink Pirouette Light Blender Pen ( for coloring the flower on the envelope)


To make the card add Tear & Tape to the inside edge of the short front on the card base.  Lay your card down as though you were going to close it and align the Designer Paper with the back of the card, then fold over that front flap so the paper attaches to it.  For any adhesive that is hanging over on the inside – place your ribbon right on top of it – then tie in a knot on the front.  Next I slid the vellum piece in place (emboss your words on it first) and then used glue dots to attach it so the glue dots are hidden under the ribbon.

When you open the card you see the other side of the Designer paper on the inside.  I have made 3 or 4 different cards with this fun idea already.

Thanks for stopping by!  Leave me a comment and let me know what you think.

monika-signature-018

Another quick note card

Here is another quick note card – well this one may take a little bit longer – it uses the Big Shot.  But it’s still cute and quick once you have your die cuts.  Well I guess technically the last card I posted also had a die cut – so really this one is just as quick as that one.

fall-fourish-4

This one uses the same Painted Autumn Designer Series Paper – yes I love that paper.  Even the designs that I didn’t think I was going to like or use I’ve been using.  I think I’m on my third pack right now.  These are the Very Vanilla Notecards and envelopes.  The paper is cut to 3×4 – so you can get 12 pieces from one 12×12 piece of the designer series paper.

I used Gold Foil Sheets on this one and die cut the little flourish – two of them – from the Flourish Thinlits dies.  The card and envelope are stamped with the Flourshing Phrases stamp set.  I used my Triple Banner Punch to punch the end of a 1″ strip of card stock for my greeting.  And then finished with some Very Vanilla Baker’s Twine.

Don’t forget about the sale on Designer Series Paper.  You can order your products HERE.

Enjoy!

monika-signature-018

DSP_SHARABLE_GIF_PAINTED_AUTUMN_NA_UK_SP

B3G1DSP_SHAREABLE_NA


CASE the Catalog

Have you ever heard some in the crafting world say they CASEd something?  Did you wonder what it meant?

Here in the Stampin’ Up! World we have a definition for the word CASE which means Copy And Share Everything.  So I guess that really makes it an acronym.  In our world we often see ideas and copy them – often with some changes but not necessarily.  Sometimes you change the colors, or the stamp set or the orientation.  Or switch the shapes of elements or any number of other things.  I went through our new catalog one day and marked a bunch of ideas that I thought would be good CASE cards. And then I’ll use those as ideas or starting points for cards I’ll be using in my classes.  This card today was one of those ideas.

in-color-compare

I used this card in my team meeting last month to showcase some of our new In-Colors.  There are 3 of the new In-colors on here along with 2 other colors from our collections.  I cased a card out of the catalog.  Can you guess which one?

It is on page 40 – on of the cards in the Pick a Pattern Suite samples.  I followed the layout and kept the elements basically but used different colors, different stamp set and card stock instead of designer paper.

This card also shows the comparison of the card stock colors so from left to right:

Powder Pink, Sweet Sugarplum, Berry Burst, Rich Razzleberry, Fresh Fig

in-color-compare-2

The stamp set I used is the new Label Me Pretty set.  I used two punches – 1-3/4″ Circle and Classic Label.  And I added a little Berry Burst bow!  This card comes together pretty quickly.

Thanks for stopping in today!  I’m finishing up prep work for my Catalog Kickoff and BOGO sale on Saturday so I may not get another chance to post here until after that is over.  If you are local to me I hope you will stop by – visit my calendar for details HERE.

Are you ready with your shopping list?  SHOP NOW 

Thanks for visiting today!

monika-signature-018

Introducing Powder Pink

Introducing Powder Pink

And the next color in the 2017-2019 In-Color Collection is Powder Pink.

in-colors4

One of the new items that comes in all the new In-Colors is this yummy ribbon.  It is 1/2″ wide Finely Woven Ribbon.  It is soft and flowing.  So nice to use on projects.

Here is more about Powder Pink:

powder-pink

Powder Pink is very soft and subtle.  In this framed project you can see the card stock and ink plus the ribbon and some designer series paper.  There is also some watercoloring on the background and inside the embossed images.

Here is a card I made:

PP---floral-boutique

This card uses the Powder Pink cardstock and ink.  One of the Powder Pink prints from the Fresh Floral Designer Series Paper Stack and the coordinating Floral Phrases stamp set.  Remember the Night of Navy and White paper we had in the last catalog – this paper stack has some of those same designs just in new colors.

Here is a peek at this project in all 5 of the In Colors.

Floral Phrases, Fresh Floral Designer Series Paper, 2017-2019 Stampin' Up! In-colors

Are you ready with your shopping list?  SHOP NOW 

A new promotion for hostesses – you can earn an extra $35 in free product – contact me to schedule your party and earn enough to get these new In Colors for free!

Do you have your copy of the new catalog yet?  Email me at monikastamp@comcast.net  I’d love to be your Stampin’ Up! demonstrator if you don’t already have one.

If you are local to me you can pick yours up in my classroom during class, stop by, or at my Catalog Kickoff Party & BOGO Sale on Saturday, June 17 – visit my calendar HERE.

Annual17_Cover

Thanks for visiting today!

monika-signature-018

Floral Boutique Thank You

Floral Boutique Thank You

Our best promotion of the year is under way – Sale-A-Bration!  It doesn’t get any better than free and you have not just one, but THREE ways to earn free products!

Shop to earn Sale-A-Bration items, join to get additional free product in your Starter Kit, or host to get more products with Stampin’ Rewards!  Ask me if you want more details about any of these!

The So Very Much stamp set is one of the Sale-A-Bration items that you can choose.  It has a beautiful large script Thank You and then several choices for additional sentiments to add in a smaller font.  I created this card that would be perfect as a Thank You for that awesome gift you received over the holidays!

navy-thank-you

I used the Floral Boutique Designer Series Paper, Night of Navy and Whisper white card stock, Night of Navy ink and the Duet Banner Punch to make this simple card.  The Thank You image is large and creates the main focal point of the card.

I also decided to decorate the inside just a touch by adding a strip of the designer paper to a white panel.

navy-thank-inside

You can earn the So Very Much set for free by purchasing the items I used for this card and make a whole stack to use throughout the year.

  • #141663 Floral Boutique Designer Series Paper $11
  • #100867 Night of Navy Card stock $8
  • #100730 Whisper White Card stock $9
  • #126970 Night of Navy ink pad $6.50
  • #141483 Duet Banner Punch $18
  • #143340 or #143343 So Very Much stamp set FREE

Thanks for visiting!

Monika

promolp_sab2017_dbws_jan0317_us

monika-signature-018

Product Suites

Questions 3 & 4 on my catalog scavenger hunt had to do with the Product Suites in our catalog.

3.  Product Suites are coordinating products that make it easy to get creative with matching products.  How many Product Suites are in the new catalog?

Here is a list of all the product suites – there are 14 of them:

  • Festive Birthday – bright & playful – pg. 10/11
  • This Christmas – traditional & elegant – pg. 26/27
  • Thankful Thoughts –  gratitude with attitude – pg. 38/39
  • Affectionately Yours – florals & copper – pg. 44/45
  • A Little Foxy – cute baby critters – pg. 56/57
  • Moroccan – artfully exotic – pg. 66/67
  • Floral Boutique – hand-painted florals – pg. 76/77
  • Pop of Pink – patterns that pop – pg. 84/85
  • By the Shore – soft & nautical – pg. 92/93
  • Serene Scenery – inspired by nature – pg 102/103
  • Playful Palette – modern & colorful – pg. 118/119
  • Irresistibly Floral – just add ink – pg. 126/127
  • Blooms & Bliss – whimsical florals – pg. 138/139
  • Fruit Stand – fresh fruit & flowers – pg. 148/149

4.  Which Product Suite is your favorite?

My favorite is the Little Foxy suite – I love those little critters.  I also like the Serene Scenery – the nature feel is definitely me.  I just haven’t had a chance to play with it yet.

I’m struggling a little with the Playful Palette – it’s a little too much color something or not colors that I like together.  I’m not quite sure.  But I did create this fun card and I do LOVE it.

circle-flower

I used the Playful Palette Paper Stack and Card Stock pack.  I did use a different stamp set – I don’t have the one in the suite.

I punched circles (or use the Layering Circle Framelits) from the different patterns of paper – crumpled them up and then semi flattened them out to glue the centers together.  There is nothing perfect about this flower – just layer the circles up however and it makes a fun flower.  The leaf is also a circle punch just folded to create a leaf.

Enjoy.

monika-signature-018


Designer Paper Squares

This card idea is actually very versatile and I’ve seen several of these online and in some swaps that I’ve received.  It is a great idea for using up scraps of your Designer Paper.  Pick your paper, coordinating card stock, a greeting and a fun little element to add as an accent.  You could use this for all different occasions.

I created this one with the Love Blossoms Designer Paper Stack and Bloomin’ Love stamp set.

my-valentine E.jpg

Use the 1″ Square Punch to punch out squares from the various patterns in the Designer Paper stack.  Arrange in a grid on a piece of coordinating card stock.  Add a greeting punched with the Decorative Label (or other) punch.

Here is another one that is a Thank You card:

thank-you-squares E

This one uses the Pretty Petals paper stack from the annual catalog and the Endless Thanks stamp set.  The flowers in the stamp set coordinate with the patterns in the paper.

I think next I’m going to create a birthday card in this same design.  What kind of card do you want to make with your paper scraps?

Thanks for stopping by today!

monika-signature-018


Thanks from SU

I received this sweet card as a Thank you from Andrea at Stampin’ Up! for being a presenter at the Tampa OnStage event in November.

Helping-me-grow

It’s a sweet note card that uses the Helping Me Grow stamp set in the Occasions Catalog.

I love the little notch in the edge – use a small circle punch – that holds the Baker’s Twine.  Thank you Stampin’ Up! for giving me the opportunity!

monika-signature-018


It’s time to try a challenge

It’s been a really long time since I’ve played along with any of the challenges that are out there.  Every day there are demos from all over the world doing various challenges.  I used to play along with a few but haven’t really done it in a long time.  Some of my friends have started a new challenge group and I finally decided to play along with one.  It’s and interesting one – not the normal challenge that most sites have.  This one limits you to only certain supplies and you can’t go outside of that – there is a “basket” that you have to use a certain number of items from and then a “pantry” that you can pull from if you need to.

TGIFCTD01-card-2

This basket of supplies was really not what I would normally pull from – the colors are not the norm for me.  But hey it was a challenge and I was up for it.  I did begin to realize that what I was seeing is that we were limited to Whisper White card stock  (from the pantry) – well gold foil was an option too but I didn’t use any.  Here is the basket of supplies:

td01 basketWe had to use at least 4 – I used the Hello You Thinlits, Work of Art stamp set and the Blushing Bride and Blackberry Bliss ink.

TGIFCTD01-card-1It turned out to be a very clean card – with all that white.  I cut the “thanks” from the Hello You thinlits and then cut off the ‘s’.  I actually cut two of them.  One I placed on the card from and then stamped over it with the big swoosh from Work of Art and the Blushing Bride ink – it left a white “frame” around where the word was.  I took that one off and used the second one and stamped it with the other swoosh and Blackberry Bliss ink – I covered almost all of it but if you look really close there are tiny white spots still visible.  I cut thin slivers of dimensionals (adhesive is in the pantry) to put on the back and adhere it into the “framed” space.  I decided to tie a little piece of White Bakers Twine (also from the pantry) on my word.  I stamped the “you” from Work of Art and then layered the white piece on a Whisper White card base.  That was all of it.

tgifctd01You can find this Tuesday Throw Down challenge here if you want to play along too.  Now to save my post and then go link it up on the challenge.

Here are the supplies that I used:

Product List
113439s

$110.00

Links by TheseAreMyStamps.com

Thanks for stopping in today!

monika-signature-018

Seasonally Scattered Thanks

Seasonally Scattered Thanks

Here is a Fall Thank You card with a fun little technique that is perfect for the Seasonally Scattered stamp set.

Scattered-thanksTo create the stamped image ink the stamp with the Crushed Curry ink. Then use a sponge dauber and the Pumpkin Pie ink to add color directly around the word.  This leaves you with the outer edges of the stamped image in the Crushed Curry color and the words in the darker Pumpkin Pie color.  You could try different combinations of colors to get a different effect.  Then cut the image out with the Oval framelit dies to add to the front of the card.

The card base is Crumb Cake with an additional layer of Crumb Cake that has been embossed with the Wood Grain Embossing Folder.  Adding Baker’s Twine, the branch underneath and the gold button finish off the card.

Here is a full supply list for you with links to my online store.

Product List

Links by
TheseAreMyStamps.com

Scattered-thanks2

Thanks for stopping in today.  Have you tried this technique?  It was one that they showed us at convention.

monika-signature-018